*Home* *About Us* *Contact* *Assignments* *Classes* *Portfolios*
Objective: To learn basic skills in drawing in one-point perspective. To render a hallway in one-point perspective.
Steps:
1. Define the following:
Perspective Vocabulary
Back lighting: Effect on an object when the source of the illumination is directly behind it and in front of the observer
Front lighting: Effect on an object when the source of the illumination is directly behind the observer
Shadow: Absence of light "cast" from object in strong light on surface below or nearby - where light is blocked
Convergence: The appearance of parallel lines or edges of a subject coming together toward a common point as they move away from the observer
Ellipse: The shape that a circle appears to take when the plane of the circle is not parallel to the picture plane; a symmetrical oval
Eye level: An imaginary horizontal plane exactly at the height of an observer’s eyes; the eye level changes as the elevation of the observer’s eye changes, but always remains horizontal
Foreshortening: The apparent reduction in the length or width of elements in a subject due to the angle from which they are viewed
Horizon line: Eye level
Line of vision: an imaginary line between the eye of the observer and the drawing subject
Mass: The physical volume or bulk of a subject; in drawing, it refers to the overall proportion and the space a subject occupies on the drawing page
Mechanical system: System using drafting tools to plot grids and projects for a pricing layout of perspective elements
One-point perspective: A drawing with one centrally located vanishing point. All parallel, horizontal edges that are at right angles to the observer’s picture plane will converge toward that vanishing point; parallel edges of the subject that are also parallel to the observer’s picture plane will not converge
Orthographic projection: a drafting method that depicts objects as viewed directly from the top and one or more sides in separate views; each view shows the object in its true shape without perspective convergence or diminishing sizes
Perspective drawing: The method of drawing in two dimensions to create the illusion of a three-dimensional subject
Picture plane: An imaginary transparent reference plane between the4 observer and subject; the picture plane is always at a right angle to the line of vision
Projection lines: Layout or reference lines that are not an edge or part of the drawing subject but are used to show how parts are related in different views (as in orthographic projection) or to a reference point (such as a vanishing point in perspective drawing)
Proportion: The size of a part compared to the whole or other parts of itself
Scale: A size relative to a person (Alice in Wonderful: "eat me; drink me")
Shadow vanishing point: The common point toward which shadows cast by parallel edges in a subject will converge; such shadows cast on a horizontal surface will have a shadow vanishing point at eye level
Side lighting: Effect of an illumination source directly to the left or right of th subject and observer
Station point: A fixed location of the observer that remains constant throughout the drawing of a subject
Vanishing point: a reference point in perspective in which the parallel lines converge
Viewpoint: Usually the same as the station
point; viewpoint may also describe a change in viewing direction so that the
subject can be seen completely; however, the subject must be drawn as if seen
from a fixed location or station point
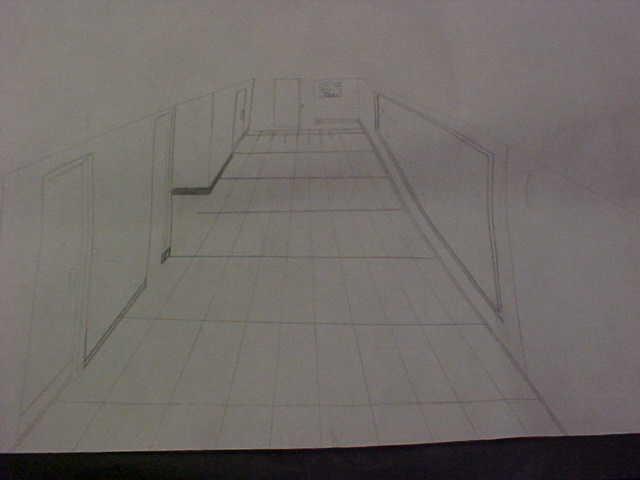
2.Use the following steps to draw a hallway in one-point perspective.

One-point perspective refers to a point converging on a plane. If you look down a long road, the sides of the road will seem join together at some point in the distance. This point is the vanishing point. When you draw using one-point perspective, all the lines that move away from you will appear to converge on this point. The lines that go up and down, and left and right will be unaffected.
 |
One To draw a tunnel, start by drawing a horizon line across the middle of your paper. Choose a point to be the vanishing point. |
 |
four Why not choose another tunnel just beyond the first one? Use the same technique as before, and then erase all the lines that don't belong in your final drawing. |
 |
two Draw the tops and bottoms of your walls. These will be diagonal lines that converge on the vanishing point. |
 |
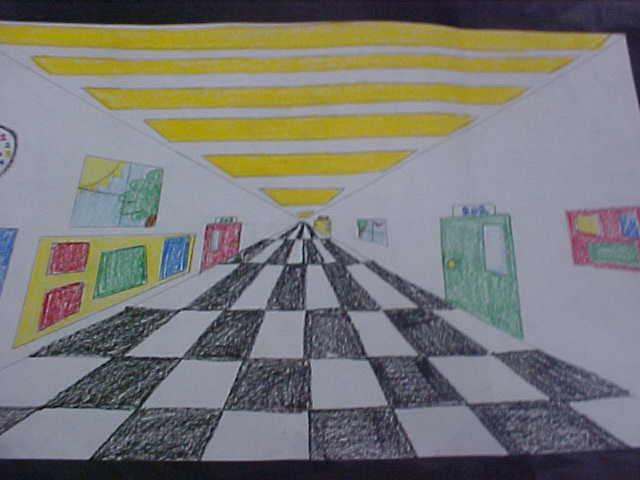
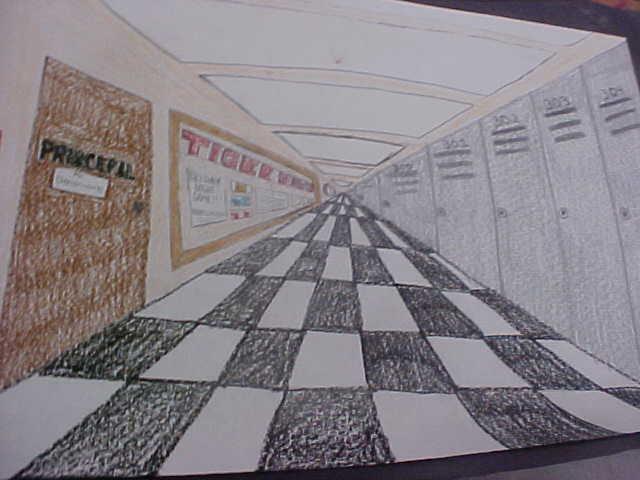
This is a student drawing of a high-school hallway. |
 |
three Choose a place to draw the end of the tunnel. Make sure that the walls are straight, and that the roof is drawn between the tops of the two walls. |
 |
This box is in the middle of a road, so all of the perspective lines will be on the bottom of the page |
3. All of your lines will converge to the vanishing point. Consider this when you are drawing doorways and windows in your hall or tiles and lights on the floor and ceiling..
4. Look at the examples below for more help.
Examples: